- Could 'mask' live footage over content which is related to will photos - although this would just create silhouettes of people moving - may not be too clear as to what the masked layer is as would need to use my laptop webcam, instead of using an Xbox connect which would be a lot clearer (would be able to capture infrared light through this too)
1) Open up Isadora
2) Find and select the ‘video in watcher’ actor.
3) Open the Live Capture Settings from the Input Menu.

3) Open the Live Capture Settings from the Input Menu.

4) Click Scan for devices, then select the video source from the drop down list. I am going to use the built in iSight camera, you may use anything. Then click Start.
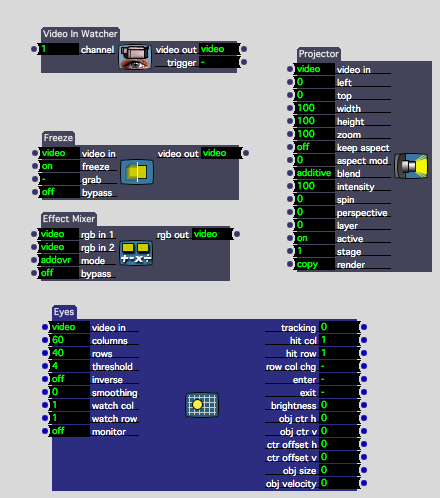
5) Go back to the first window and then find these actors:
Freeze
Effects Mixer
Eyes
Effects Mixer
Eyes
6) By clicking on the small dots (from left to right) connect the actors so that they appear as follows:
(note the projector is not currently being used)
IMPORTANT: Notice how we are using two feeds from the video in watcher, one going to the Freeze actor and the other into the Effects Mixer Actor. This is so we can freeze a still picture, then compare it (or look at the ‘difference’) between it and the live feed. This gives us our data for motion tracking. We take the still image by clicking the ‘Grab’ on the Freeze actor:
MAKE SURE NOTHING, OR NO-ONE IS IN THE SHOT/FRAME WHEN CLICKING GRAB!
If not this will conflict with the data. This is the most common thing to go wrong!
If not this will conflict with the data. This is the most common thing to go wrong!
You should now see some black and white images with Red and Yellow boxes and lines.
The red lines correspond to X-Y, the horizontal and vertical points of the tracked image.
The yellow box outlines the biggest object in the shot, also giving out data in relation to the top left hand corner of the box.
The yellow box outlines the biggest object in the shot, also giving out data in relation to the top left hand corner of the box.
9) It may help, just for experimenting, to join up the projector so you can see the live feed on screen, if not please skip this bit. Otherwise it should now look like this:


10) A few tips:
Turn on smoothing in the Eyes actor to smooth out values.
You can use the threshold in the Eyes actor to ignore/bypass and unwanted light/small objects in the frame.
You can inverse/invert the incoming video into Eyes if you are wanting to track darker objects, or sometimes it can just work better depending on the lighting and space.
Sometimes using a Gaussian Blur in between the output of the effects mixer and eyes can smooth out the video and make tracking a little easier.
11) Now play… there are endless possabilaties as to what you can do with this X+Y data, for this use these outputs:


No comments:
Post a Comment